Sunday, September 30, 2012

More Fun with Vegetables ~by Erica at High Rocks


Pocahontas County is growing a lot of food these days.  So much, that people are starting to get creative with it.  Some might even say strange.  We’d like to share another recipe from the High Rocks Grow Appalachia Test Kitchen and spotlight some veggies that found fame at a local festival. 

We held our healthy cooking class at High Rocks on Tuesday and lots of teens prepared and ate sushi for the first time.  Appalachian Sushi that is…
Appalachian Sushi 
(no, really…it’s good.)
2 cups of cooked rice
¼ cup apple cider vinegar
1 tsp  salt
 1 cup cooked butternut squash cut in strips
½ cup chopped walnuts, almonds
2 minced garlic cloves
½ medium onion diced
½ cup cabbage diced (can also add/ substitute diced collard stems)2 tbs soy sauce (or Braggs)
¼ cup crumbled blue cheese
 8-10 large collard or chard leaves, steamed
 
While rice is cooling, stir in vinegar with the salt dissolved in it.
Sauté the onions, cabbage, nuts, garlic in olive oil and butter until onions and cabbage are soft.  Remove from heat and add crumbled blue cheese.
 
Cut steamed leaves down the center vein.  Make a 1inch line of rice and nut mixture at the end of a halved leaf.  Add 1 or 2 strips of butternut squash.   Roll as tightly as possible from the filling end.  Cut the roll in to 1in. pieces with a very sharp knife. 


Participants also made Appalachian Humitas—something like a tamale, but with fresh local corn (see our earlier post).  Both recipes were hits!  We also made impromptu butternut squash French fries with a dash of cinnamon which pleased even the most discriminating palettes.   


Food took center stage again on Saturday for the town of Marlinton’s Road Kill Cook-off and Harvest Festival.  High Rocks Grow Appalachia was there sponsoring a produce pageant.  Winners got vouchers to spend at the Marlinton farmer’s market.   I’ll let the contestants do the rest of the talking.  Enjoy. 


Friday, September 28, 2012

Butternut Squash: A Beautiful, Healthy, and Delicious Meal~Pine Mountain, Maggie Ashmore


I love butternut squash, and it seems that our Grow Appalachia participants are coming to love this nutty flavored, versatile squash as well.

Chris Hockenberry with one of his many wheelbarrow loads of Butternut!
I am a huge fan of all things winter squash. I love that winter squash can be stored for long periods of time without refrigeration, and the fact that that winter squash can be made sweet or savory depending on the cooking method. There are endless varieties of winter squash available in seed catalogs, but the good ole butternut squash has won my heart.

The vibrant orange color of butternut flesh shows just how vitamin packed this squash is. Butternuts are good for heart health due to their high dietary fiber content, folate levels, and carotenoids. The potassium levels in butternut are great for bone health, and the amount of vitamin B6 found in the fruit helps to support nervous and immune system function. On top of all this, butternuts promote vision health with beta carotene, and contain massive amounts of vitamin C.

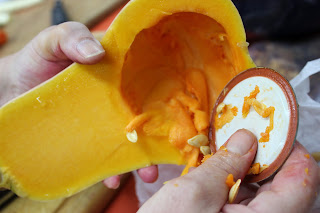
Scooping seeds during the healthy cooking workshop
If the health benefits aren’t enough, butternut squash is absolutely delicious and easy to cook. One of the most annoying parts about preparing any winter squash for cooking is removal of the seeds. One of my good friends, Eliza Hudson, showed me a wonderful trick that makes this step painless and quick. After cutting the butternut in half (and peeling if need be), use an old canning jar lid to scrape out the seeds. I know this doesn’t sound all that exciting, but believe me – it is amazing. Please try it.

Butternut squash is a food that can either be prepared for use in fancy dishes, or simply roasted in the oven. Both preparations will yield yummy results. I will share two simple ways to prepare the squash.

1.   Slice in half, rub with olive oil or a little butter and roast in a 425°F oven for about 45 minutes, or until tender. Remove from oven and let sit until cool enough to handle. Scoop out the flesh easily with a fork or spoon. Season flesh however you like (sweet with butter, sugar and cinnamon, or savory with butter and sage or thyme, etc.). I love the taste to sage with winter squash.

2. Peel squash and remove seeds. Cut into 1 inch cubes. Toss cubes with olive oil. Roast in a 425°F oven until tender. Serve with sautéed onion, garlic, sage, corn, or any other vegetable of your choosing.

Last fall one of our fabulous participants gave Kathleen and me about 2 bushels of butternut! (I know that I am one of the luckiest girls in the world, because I often return home to beautiful produce on my porch!) With all of this butternut at my disposal I began trying all kinds of recipes. I enjoy using Martha Stewart’s recipes. They are easy to follow and almost always turn out well. Her website also allows you to search by produce type and then flip through 30-100 different recipes featuring the produce you want. Try searching her butternut recipes.

My favorite butternut recipes from her site are Butternut Squash with Sage Lasagna, Butternut Squash with Sage, Butternut Bisque, and ButternutSquash Soup. Since our participants are beginning to harvest Shiitake mushrooms from logs we inoculated during our March workshop I think I will have to try the whole wheat pasta with butternut squash, beet greens, and shiitakes next!


A fairy carpet of little oat sprouts is a pleasing site for sure. -- Abingdon, VA


Heather here. At our latest workshop we seeded about half our garden in oats. The other half, right now still full of fall crops, will be seeded with Austrian winter peas. Below is the handout that we created for Grow Your Own gardeners. 


Cover Crop Time

Benefits of cover crops:

  • Protect the soil from weather.  Bare topsoil can easily be washed away by rain, wind, snow & ice, depleting organic matter in your garden.
  • Cover crops add diversity to your garden, especially during the winter months and create habitats for beneficial insects
  • Winter cover crops are tilled into the garden in the spring, adding valuable organic matter which improves soil tilth—health and structure.
  • Legume cover crops, such as clovers and peas, add "free" symbiotically-fixed nitrogen.  Nitrogen is an important fertilizer needed for healthy plant growth.
  • Deep rooted cover crops, such as rye, can break up hard, compacted soil, while large leaved cover crops such as buckwheat can help reduce weed pressure.

It depends on the needs of your field or bed to determine what cover crop is “best”. For example, is weed pressure or nitrogen deficiency more of an issue? Leguminous crops add more nitrogen while grasses like oats are better at blanketing out weeds if planted thickly.

We have chosen to sow oats this fall as they will “winter kill”— meaning they will die back in the winter and be easier to till into the soil in the spring.

Notice that there are many patches in the EFIA garden that are not ready for a cover crop yet.  In order to get the benefits from a grass cover crop and a leguminous cover crop, we will plant oats in bare soil areas now (September) and sow Austrian winter peas in spaces where crops have yet to be harvested later in the season (October).

Planting:

The key is to distribute the seed evenly over bare soil areas.  This can be done with commercial seed spreaders for large acreage or by hand for smaller gardens like ours. 

When planting oats alone, not mixed in with another crop, 100lb/acre is sufficiently thick. Each garden is about 1/27 of an acre, so you would need roughly 4lb to cover your entire plot. Some of you have larger gardens and some of you are still growing other crops. Plant the oats in any blank spots you have and you can fill in the holes with Austrian Winter Peas that we will be giving out later in the season.

We tilled our ground once before seeding the cover. If you would like to borrow our tiller let us know. Otherwise, make sure your bed(s) are free of all crop residue and broad fork and hoe up the soil to loosen it up and get it ready for planting. Rake in little furrows all down the bed and scatter seed in a sweeping motion. Rake soil over the top and water in. Plant your oats as soon as possible, and certainly NO LATER THAN OCTOBER 4th. The oats need time to get growing to in order to actually cover the ground before cold temperatures set in!


Isn't he sweet? Volunteer Drake built shelves for us in the truck/shed. I wish we could  get that hand truck out of there. It is ruining the vibe. 


That's it that's all. 

Sweet Honey: BDVP-Jessica

      
Some hard workin' women!

On this cold, rainy day it sure seems like it was ages ago when we pulled a couple of honey supers off of our bee hives at the Bluegrass Domestic Violence Program.  Actually it was only a few weeks back and it was actually very warm and sunny that day!

We are still pretty new to beekeeping at BDVP and this was our first time extracting honey from our own hive.  We have been playing around with beekeeping for the ast few years but, this was our first year to try it on our own.  Last year we had some wonderful volunteers who maintained our hives and harvested honey for us.  Well, this year the same, lovely volunteer helped us extract honey on our own!


Checking the frames.


We began by examining the hive and pulled out 2 full honey supers. We encouraged the bees to move down into the hive by using a very stinky bee repellent.  This way we were able to remove the full supers and frames without bringing too many bees with them.  Mary, a crisis counselor at our facility has been wanting to get into the hive this whole year but, we hadn't been able to sync up our schedules to make it happen.  She was finally able to come out and get into the bees when we pulled the honey.  I have to tell you that this woman is fearless! It was awesome.  In the past, we have had plenty of residents and staff members who enjoy walking down and watching Susun (our allstar volunteer) and myself work with the bees.  They (understandably) tend to prefer observing us from afar.  Mary, on the other hand, was right up in there with us!  This lady is a natural. In fact, she's the one that got all of these great close shots of the hive.  Thanks so much, Mary!


Susun, our ever faithful beekeeping mentor... Thanks!!!!


In order to extract the honey we had to borrow an extractor from a local beekeeper.  We met up the next morning to get going on spinning out our honey.  We had lots of help!  Our faithful beekeeping mentor, Susun was back to show us how it's done.  We also had a number of staff, volunteers, and clients participating.


Dean is getting really psyched about using the extractor!


Frame ready for the extractor
  We started out by pulling the frames out one at a time and cutting the cappings off with a hot knife.  This opened up the comb so we could then put 2 frames in the extractor at a time and start spinning.  You "spin" out the honey by spinning the extractor one way for awhile, then flipping the frames over and spinning it again...then finally one more flip, some hard cranking.....spin and pull them out.

Go Mary!


Crankin it!

Keep on crankin'.....


After all of this hard work, you open up the spout on the extractor and let the honey flow! It's just like magic....

We got about 5 gallons of honey this year and a whole bunch of wax cappings.  We recently made some more of our healing salve with some of the beeswax and we are planning on making some more lip balm in the coming weeks.... We'll keep you posted on how it turns out. 


Sweet Honey!


 *This blog was brought to you by the letter Beeeeeeee......... :)

Thursday, September 27, 2012

Have a Fried Green Tomato in December!

Hello, Saxon here enjoying a cloudy day at the beginning of Fall in Rockcastle County.  

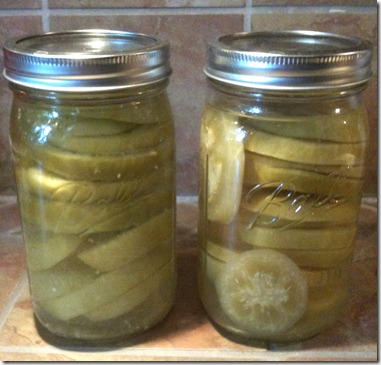
This morning I admired 6 jars of green tomatoes, sliced thick and water-bath canned with spring water, lemon juice, and salt, sitting on the counter in our kitchen here at ASPI.  These were made a few days ago after we cleared out some plants to make way for fall cabbages.


I really enjoy the occasional side of fried green tomatoes and with all the fruits and vegetables we've produced here this summer I've been trying my hand at canning for the first time in my life in order to keep the bounty from going to waste.  Now I've found a way to keep green tomatoes local and ready for frying year round!  This is all really thanks to one of are most active participants, Armilda Barnes, who cans anything and everything, down to corncob jelly.  She was already canning green tomatoes a month or so ago when we last went to see her, but I haven't had the chance to try it out myself until now, after cleaning out the garden plot some.  

To can:
  • I had about half a five-gallon bucket-full of green tomatoes and these fit into 6 quart jars. 
  • They recommend wide-mouth jars, but I already had small-mouth around, so I simply cut the tomatoes in half if they were too large, but most fit without problem.  Cut to desired thickness for frying.
  • Heat canner water and sterilize jars, lids and rings.
  • Heat clean water in a pot, enough to fill six quarts.  
  • Place green tomato slices in hot quart jar, fill with hot water, add a pinch of salt and a spoonful of lemon juice.  
  • Now here's where the recipe becomes at your own discretion.  When I looked online, most cold-pack methods recommended putting jars in the water bath for up to 45 minutes.  Hot-pack methods recommend as low as 5 minutes!  This seems like such a huge difference, I was a little nervous about the length of time.  Five minutes didn't seem long enough, but since I did do hot-pack I decided to go with a time of 15-20 minutes in the waterbath.  This seemed to work fine, though I've not yet gotten a chance to try the tomatoes, the lids sealed ok.  
Perhaps canning green tomatoes is not unfamiliar to some of you, but I hope that some will be excited by this idea, as I am.  Because if you've ever tried to freeze sliced green tomatoes and use them later for frying, you know what a let down these can be, if not a total mushy failure.  I look forward to trying the canned version out this weekend.  Happy canning!  


Wednesday, September 26, 2012

Dehydrating Takes Up Less Space....: Tina

Our freezers are full from our gardens bounty by now and most of us are running out of room. That is why I have started dehydrating.  I wish I had gotten a picture of all the peppers before I thought about writing this post. I had a lot of banana peppers, bell peppers and jalapenos to dehydrate. Had enough to fill the whole dehydrator, which has 9 trays. The cayenne peppers get dried by hanging on a string, not in the dehydrator.
 
 
This is how they look before dehydrating cut up on trays.
 
 
This is after 8 hours, they dehydrate to very small pieces.

 
All 9 trays fit into 3 jars,
 (the jalapeno jar was already 3/4th full, 
                                                            I just finished filling it up)

 
Your able to fit a lot into these jars,  without taking up a lot of room, they rehydrate beautifully. They last a lot longer stored this way and won't get freezer burned. One thing I did learn was, not to dehydrate the banana peppers if they have been frozen first, they turn dark brown and look unappealing.
To rehydrate: Just add the amount that you want to use in a bowl with warm water and let soak for 5-10 minutes. 

Henderson Settlement / White Oak Happenings ~ Jackie Waldroop


Aaron and I have been busy visiting and talking with our gardeners about how they feel the season went for them . Several of the gardeners have already started getting their gardens ready for next year by plowing their gardens under, several more gardeners have planted fall crops.  Kristin Smith from the Whitley County Extension Office conducted a class on preparing your garden for the fall.
We began the class in a classroom discussing what plants you could plant in the Fall and why you should plant cover crops. We then moved the class to the Food Pantry Garden, where Kristin used this garden as an example of planting a Fall Garden.

Kristin
Kristin discusses planting in the fall garden.


 Last night we had a Grow Appalachia group meeting and spaghetti dinner, we discussed Cover Crops, suggestions for classes for next year and our upcoming Fall Harvest Celebration.
The gardeners stated that they would like a few classes in the spring on how to grow fruits, Blueberries and strawberries were the fruits they mentioned . Aaron and I discussed Chicken Tractors and gave out information on different types of cover crops. ( By the way,  Thanks, Maggie,  for posting the information on cover crops) ,we then gave out Rye seeds to those who were interested in planting a cover crop. We decided to have our Harvest Celebration October 27th, the gardeners ageed to work together to plan games for the children, and to help with planning the celebration


Games committee!

 
Aaron and Daryl eating spaghetti

Tuesday, September 25, 2012

HAPPENINGS AT PROJECT WORTH OUTREACH

Hello everyone. This is Alex Sanders from Project Worth Outreach in Menifee County, Kentucky.  I hope everyone is well this week.

I have spent several days visiting garden sites to see what everyone is doing. We have several gardeners with some fall vegetables but most of our gardeners have began the process of closing down their gardens and getting them ready for the upcoming winter season. Myself, we still have green peppers and fall green beans in the ground. We hope to harvest these before the first hard frost of the year. In addition, we are in the process of transforming our garden from raised garden to in-ground for next spring. One of our gardeners had a lot of success in raising a mounds garden and we were so impressed that we were movitated to go that route next year. We have very much enjoyed our gardening experience this year with Grow Appalachia and hope to do it again next year. We have learned a lot about gardening and made many mistakes that we will learn from.  It has given us more food than we expected.  We have learned to can food and have eaten a lot healthier this year.  I usually get a summer cold in August but this year I did not.  I cannot tell you the last time I didn't get a summer cold and I attribute this to eating healthier this summer.  The other benefits from participating in the Grow Appalachia / Project Worth Gardening Program this year was that I found the time spent working in the garden was therapeutic, my family spent a lot of quality time together and therefore, we became closer and more familar with each other, and it was fun to see vegetables go from seed to storage.

Our next Grow Appalachia participant's meeting is schedule for October 1 and that is when our participants will turn in their journal for review and the best journal will win a first place prize. We have set up a panel of independant judges to review and name the winner. I am looking forward to reviewing these journals. It should be an interesting experience. Also, at this meeting we will discuss the successes and problems that have been encountered this year as well as gauge the interest of of participants in participating in the Grow Appalachia / Project Worth Gardening Program next year if we get funded. The other item on the agenda for this meeting will be requesting the participants to fill out a survey on their Grow Appalachia / Project Worth Outreach Gardening Program experience. Finally, our last Grow Appalachia / Project Worth Gardening Program meeting for this year is scheduled for October 22. This will be our wrap up meeting followed by a pot lunch meal with the dishes being prepared with items that our participants grew in their garden this year.

Well, that's about all I have for today. I hope everyone has a great week

Sunday, September 23, 2012

Salsa! ~by Erica at High Rocks

 
“They feel just like eyeballs!” said the teenager with her hands buried deep in just-blanched black plum tomatoes. Was she preparing a feature for a haunted house? No, but not a bad idea!

“I don’t eat things like this,” said another. These girls were up to their hoodies in fresh tomatoes, onions, garlic and herbs at the High Rocks Grow Appalachia “Preserve the Bounty” workshop this week.

They joined Grow Appalachia participants in learning about dehydrating, water-bath canning and pressure canning. At the end of the night, jars of preserved whole tomatoes and salsa lined the counters. All the girls, even the ones who “only like Tostitos salsa” were attacking bowls of the stuff with chips.

The empty bowls and their evaluations of the workshop attested that it was“Awesome.”


Friday, September 21, 2012

An Appetizing Autumn Meal: Bon Appetit! ~ Pine Mountain, Kathleen powers


Roasted carrots and parsnips
This past Tuesday we had our second healthy cooking workshop. Once again we collaborated with the wonderful Jenny Williams who led the workshop and introduced us to some great new ways to prepare fall produce. Our turn out was not as great as we had expected but those who attended definitely got their  moneys’ worth, seeing as Jenny is always fun to listen to and is a great cook as well.
First on the agenda was to introduce participants to some new ways to prepare fall produce. Jenny sliced and roasted beets, carrots, parsnips, and a butternut squash while Maggie tore up fresh kale and mustard greens to make a roasted fall vegetable salad. While the veggies were roasting Jenny taught us how to make a rubbed kale salad (you simply pour a little olive oil on your greens, kale and mustard for us, sprinkle a little coarse salt over it all and massage the greens for several minutes to tenderize them, no cooking involved!) which is as easy as can be. The salad came together quickly, roasted veggies topped the greens and then it was finished off with a homemade honeyed cider vinaigrette, and oh my was it ever delicious!
Maggie and Jenny prepping veggies
Next up were a couple of pizzas using tomatoes and herbs from the garden. Many of our participants have been dehydrating tomatoes this summer so we wanted to cook something that would include these delicious slices, and pizza was the perfect thing. We also had many participants growing herbs this summer, but they had no idea how to incorporate them into their cooking, so we decided to top our pizzas with some tasty basil pesto, really who can resist fresh pesto? Maggie made our pizza crusts with her go to quick and easy whole wheat dough recipe and we topped them with several variations of the tomatoes, pesto, and cheeses.
        Last on the menu for the night was a second preparation of beets called rubies and pasta. Beets get such a bad name and are disliked by so many people, but Maggie and I are both staunch believers in the amazing deliciousness of beets, so we set out to try to change at least a couple of non beet believers and I think we may have been successful thanks to this dish! Rubies and pasta, a classic Italian dish, was completely new to me, so I was interested to see how it would turn out. Jenny roasted several more beets chopped them into small chunks, cooked them with a bit of garlic, olive oil, and red pepper, mixed them with pasta, garnished it all with some fresh basil and left us all with mouths watering, ready to eat.
So we all sat down to enjoy our meal (salad, pizza, pasta, and zucchini cake to top it off, really who can complain about that!) and to talk about fall gardens, food preservation and the many other fun conversations that a good meal can bring about. All in all I think we all learned something new and went home excited to try out some new recipes, I know at least I did!


Maggie is ready to eat!


A big thanks to Jenny once again for her great skill and enthusiasm! Here are a couple of the recipes from the workshop:


Basil Pesto


Pesto is great on pizza, pasta, warm bread, mixed in scrambled eggs etc. Pesto can also be frozen in large batches or if you wish to have individual servings pour pesto into an ice cube tray, freeze completely, then put individual “pesto cubes” in one freezer bag and you can thaw just as many as you need at a time.


Ingredients:

Coarse salt and ground peppers
1 garlic clove, peeled
3 packed cups basil leaves
1/4 cup toasted pine nuts 
1/2 cup extra-virgin olive oil
1/4 cup freshly grated Parmesan

Directions:
On a cutting board, sprinkle 1/4 teaspoon salt over garlic and roughly chop. Using a flat side of the knife blade, crush mixture into a thick paste. Add to a food processor with pine nuts, basil, and 1 tablespoon oil. Pulse until ingredients are finely chopped. With machine running, add remaining oil in a slow, steady stream. Add Parmesan and pulse to combine. Season with salt and pepper.
Use walnuts or pecans for the pine nuts. You can also replace half the basil with arugula or parsley. Or try cilantro along with pumpkin seeds.


Easy Whole Wheat Pizza Dough

Pizza w/ dried tomatoes and pesto
Ingredients:
2 ½ teaspoons (one packet) dry yeast
1 cup warm water
1 teaspoon sugar
1 Tablespoon olive oil
1 cup all-purpose flour
1 cup whole wheat flour

Directions:
Combine dry yeast, sugar, and warm water in large bowl. Whisk to combine. Let sit for a few minutes until mixture becomes bubbly. Mix remaining ingredients together with water and yeast. Knead for a few minutes on a lightly floured surface. Place in an oiled bowl and cover. Place dough in a warm location and let rise until doubled in size (roughly 45 minutes). Knock down dough with a fist and let stand for 10 minutes. Spread onto a baking sheet and create a pizza!


Roasted Root Vegetable Salad with Honeyed Cider Vinaigrette (serves four)


The Salad

Ingredients:
2 beets
2 parsnips
1 small acorn or butternut squash
4 cups of greens – any sturdy lettuce will do, but endive is good if you can find it, or arugula, or even very small, tender kale, turnip greens, or mustard greens
2 TBS olive oil
Salt and pepper to taste
Chopped, toasted walnuts, pumpkin, or squash seeds to garnish

A beautiful salad
Preheat oven to 450°. Peel vegetables and slice thinly – about a quarter inch. Toss with olive oil to coat and spread in a single layer on a sheet pan covered with parchment paper or foil. Sprinkle with salt and pepper to taste. Roast until vegetables start to brown around the edges, then use a spatula to lossen vegetables from pan and flip over.
Meanwhile, clean and dry greens and tear into small pieces. Toss with 2 TBS of dressing and arrange on a platter or individual plates, Pile roasted vegetables on greens and drizzle with more of the dressing. Top with toasted nuts or seeds and serve.

Honeyed Cider Vinaigrette

Ingredients:
1/3 cup cider vinegar
2 TBS honey
½ Tsp kosher salt
¼ Tsp pepper (Aleppo or cayenne add a nice kick)
2/3 cup olive oil

Whisk all ingredients until smooth and thick. Serve with greens. 

Rubies and Pasta (serves 4)

Ingredients:
2-3 beets
Pink pasta!
4 cloves garlic, finely chopped
1 lb pasta
2 TBS olive oil
Parmesan cheese to taste
Aleppo or red pepper flakes to taste
Chopped parsley and or basil to taste (about 1 cup total)

Roast beets in a 450° oven by placing them in a baking dish with about a half inch of water and covering the dish tightly with foil. Roast until fork tender, about 45 minutes to 1 hour, depending on size. Let beets cool until you can touch them, then slips the skin off. Cut the beets into half inch chunks and set aside. You can do this up to 3 days in advance. Refrigerate beets if you are not using them immediately.

Cook pasta according to package directions and then drain, reserving ¼ cup of cooking water. In a skillet or pot large enough to hold pasta and beets, heat the olive oil. When the oil is shimmering, add the red pepper, garlic, and chopped beets. Stir until garlic has softened , but not browned, and beets are heated through. Stir in cooked pasta, and add the reserved cooking water a tablespoon at a time of pasta is too dry. Remove from heat and top with chopped herbs and parmesan cheese.

I hope all you blog readers will give these delicious recipes a try if you find yourself with some fall produce and an appetite, happy cooking!


Thursday, September 20, 2012

PRESERVING IT AT THE DAVID SCHOOL

Canning supplies bought locally from
The Hardware Inc., Hueysville

The St Vincent Mission program had their Food Preservation class recently at the David School right down the road from the Mission. The David School focuses on teens who for one reason or another may not graduate high school. They have small classes and are able to work with the students one on one to better meet their needs. They also have a big kitchen so it was a great place for our class.
Stringing, snapping and
storytelling 

We started out the day with cleaning, stringing and snapping a half bushel of white half runner beans donated by Todd Howard. Emily Shepherd, one of our participants, led the class and it was a great time of visiting and sharing-just like in the olden days. One story Emily told was about how when she and her husband Roger moved back to the homeplace they would do all their canning in a wash tub outside over a fire. I can’t even imagine tending a fire all day in mid-August putting up canned goods.

After we got the beans ready, I did a short presentation on dehydrating and freezing and we had lunch-chicken tenders from Sharon’s, the local and only restaurant in David, KY along with veggies from the Mission’s community garden. (What part of the chicken is a tender anyway?) The David School teachers joined us for lunch where I passed around samples of fermented tomatoes. Todd had put up five gallons of them a few days earlier and I asked him if we could try them out at the class. The best part was watching people’s expressions when they tasted the tomatoes. The first thing you saw was the reaction to the aroma, which is stronger than expected, then the facial expressions. I did warn them that Todd and Gary thought they had enough tomatoes for a 10 gallon crock but ended up with 5 gallons of tomatoes instead. Lesson learned: measure the tomatoes before putting in the salt.

Bobby, Marilyn, Carol and Mike
listen to Emily 
After lunch it was time to pressure can our beans. Emily took us to the kitchen and showed us all the safety measures built into the pressure canner before filling it up and setting it on the stove to do its thing. Only it didn’t. After an hour and twenty minutes of trying to build up pressure we decided to throw in the towel and call it a day. I took the canner home with me and following Emily’s steps successfully canned my first batch of beans. We aren’t sure but the general consensus is that the draft hood over the stove created too much draft for the canner. The instructions did say, “Keep canner out of drafts”.

"I just don't understand why it won't
build up pressure."


All in all it was a fun time with friends which is what usually happens at most of our Grow Appalachia classes and gatherings. Next up, Healthy Cooking.

Updates from ASPI

Written by Saxon

Though she's been here a few months, I would like to officially welcome ASPI's new Executive Director, Suzi Van Etten.  With her husband Hal and baby daughter Maddie, Suzi recently moved from New York to work at ASPI.  They have roots in this area and are excited to be back!  Suzi is excited about the Grow Appalachia program and has many dreams and new ideas to be carried out in the coming years. 

It's a busy time here at Appalachia--Science in the Public Interest.  Though gardens are slowing down, we met with gardeners on Tuesday to talk about fruit and berry plants and some perennial vegetables which can go in in the Fall and then be of use for years to come!  We had a packed house!  Rockcastle residents continue to be invested in the idea of gardening to support their families and communities. 

Coming up in a few weeks is the Mt. Vernon Bittersweet Festival (October 4th-6th).  Our Rockcastle Co. section of Grow Appalachia has been asked to have a float in the parade and to table at the fair.  We are having fun coming up with ideas for the float; our hope is to get youngsters from participant families to be a part of a "living garden" that will show off our enthusiasm for the project.  We will also be flyering with information about Grow Appalachia and how folks can get involved in the future. 

Though our garden here at the ASPI office has tapered off some (not sure if we'll get many more red tomatoes if this cool weather keeps up!) we have put in a few rows of winter-hardy greens and some peas and cabbage.  For the other plots in our property, once they are cleaned of summer garden debris, our plan is to put in cover crops to hold soil and nutrients for next year.